
COLORING BOOK APPLICATION
Example
Let's start with an example first. Below is a coloring application. First, click a color, then click an area to paint that area.
Overview of the Technique
Let's start with the what cannot be done first: Flash cannot do a "flood-fill" during runtime. To overcome that limitation, there are at least two possible ways:
- Pre-color or pre-tint each separate area with all the possible color in the palette.
- Change the color of an area by using the Color object.
In Flash 4, the "pre-coloring" or "pre-tinting" option is the only way, because there is no Color object. Fortunately, the Color object in Flash 5 makes the task much easier. Here are the general technique:
- Prepare a picture to be used. The picture must be in vector format before it can be used, it cannot be in bitmap or raster format.
- Divide the picture into areas that can be filled separately.
- Make a movie clip for each fill-area. A fill-area must only have one color. (Do not include outline or lines in the movie clip. If there's outline, put the outline on a separate layer above the fill-areas.)
- Position each movie clip on the exact picture position, on the proper z-order.
- Make the fill-area movie clips (from Step 3) clickable.
- Create buttons for the color palette. Set a mechanism that indicates what color is currently selected.
- When user click an area, color that area with the selected color.
Step by Step Example
Step 1: Start with a picture. As said earlier, the picture must be in vector format in Flash before we can go to the next step. If importing a bitmap/image, then the bitmap needs to be traced.
Let's use this pumpkin picture as an example.
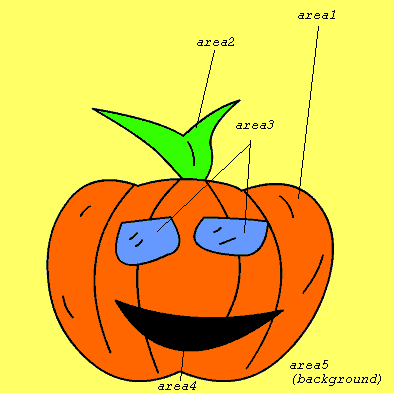
Step 2: Divide the picture into fill-areas. In this example, there are 5 separate fill-areas as labeled above. You might wonder, why only 5? The division of the picture is entirely up to the designer. In this one, I decide to treat the two eyes (area3) as one object. By combining them, if one of the eye is colored, the other will be colored as well.
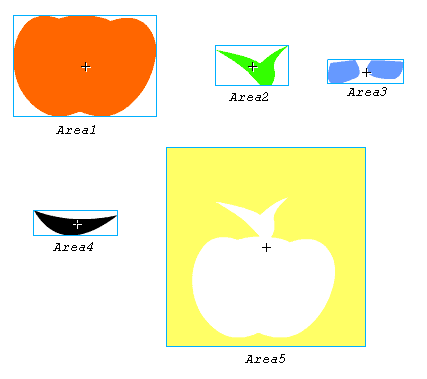
Step 3: Make a movie clip for each area. Remember not to include the outlines and lines. I suggest putting all lines on a separate layer, if they aren't already.
Once the lines are on a separate layer, select the desired shape, then do Convert-to-Symbol. For each symbol, set the behavior to Movie Clip. Name the movie clip: Area1, Area2, ... to Area5.
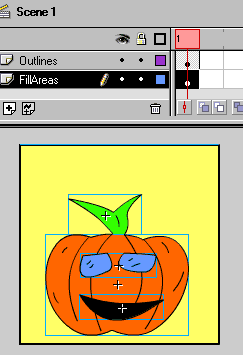
Step 4: Make sure that all the symbols are in the correct position in the Scene1 stage. For example, below is the pumpkin project. The blue rectangles indicate the symbols position. Also notice I put the the outlines on a separate layer above the shapes.
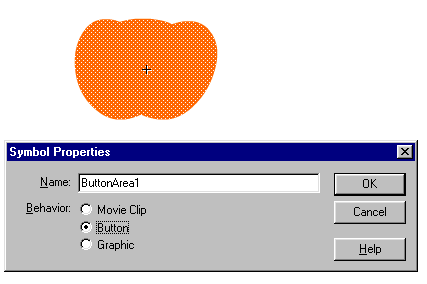
Step 5: Make each Area symbol clickable. One way to do this is by embedding a Button into the movie clips (these movie clips are created in Step 3). Let's start with Area1. Edit the Area1 symbol.
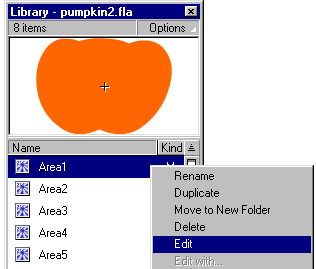
The orange pumpkin shape should be shown on the stage now. Select all of it (do Select All), then do Convert To Symbol. Name the new symbol: ButtonArea1. Set behavior to Button.
Let's do something fun now. In the ButtonArea1 action panel, put the following code:
on (press) {
  iColor = new Color(this);
  iColor.setRGB(_root.fillColor);
  delete iColor;
}
Here's what the movie explorer looks like:
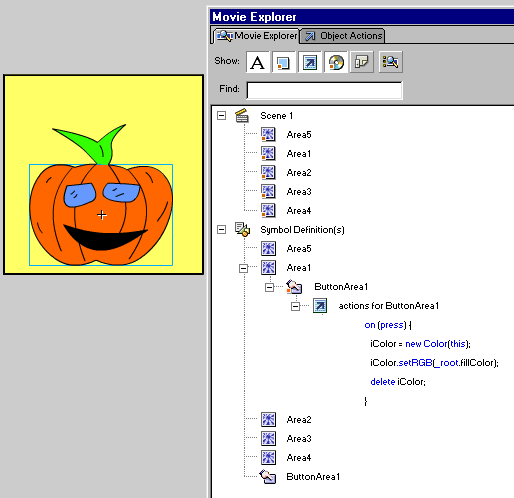
Test the movie. It should run like below.
Click the pumpkin, it should turn black.
What is going on? Why does the pumpkin change color to black when clicked? The color of the pumpkin is being changed by:
iColor.setRGB(_root.fillColor);Because _root.fillColor has not been set yet, its value is 0 (black).
So far, we have seen the ability to change the color of a movie clip during runtime by using the Color object. If something went wrong at this point, then review and correct them before continuing. Otherwise, do the same procedure outlined in Step 5 for Area2, Area3, Area4, and Area5 movie clips.
<<GO TO THE NEXT PART>>
<<INDEX>>
(C) 2001-2005 F. Permadi
Terms of Use