
FLASH TIPS
These tips are written for Flash 4, however, they may apply to newer versions.1. CREATING OUTLINED TEXT
2. PRINTING A STORYBOARD
3. WHAT IS THE <!-- text used in the movie--> TAG FOR
4. TINTING IMPORTED IMAGES
Example:
Steps to create:
- Type the text (use large bold font - I recommend at least size 48).
- With the text selected, break it apart. (Modify -> Break Apart)
- The text is now turned into curves. Use paint bucket to change the color of the text (fill).
- To create the outline, there are 2 ways:
a) use the pen tool to draw outlines around each shape; or
b) create a duplicate of the text and expand/shrink using different color. (For example: Paste the duplicate on a different layer below the original shape - use Paste-in-Place to position it on exactly at the same position, fill the duplicate shape with the desired outline color, then do Expand Shape of 4 pixels.)- The result between method a) and b) will differ slightly. I prefer method b) because method a) tends to shrink the curve. One the example shown above, the first text uses method a), the second one uses method b).
Variations: To create emboss effect such as below, simply make another layer below the outlined text, copy the text, and nudge the text several pixels downward and to the right. Then fill it with the desired shadow color.


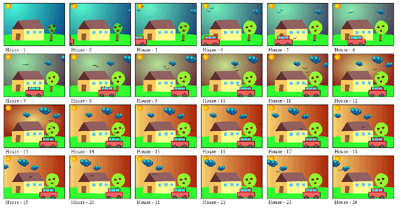
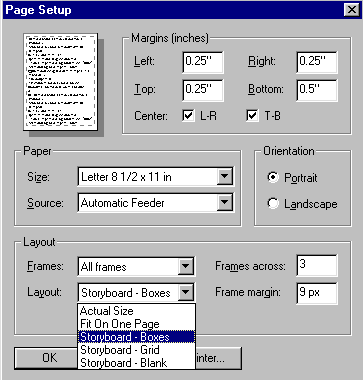
There is a hidden treasure in the Page Setup option menu in Flash. It is an ability to print a story board of a movie easily.
To access this feature, go to File -> Page Setup menu (shown below).
In particular, have a closer look at the Layout section above.
To print a storyboard, first select All frames from the Frames pull down menu. Then, select one of the Storyboard layouts:
- Storyboard - Boxes will put boxes around each thumbnail
- Storyboard - Grid will put grids separating every row and column
- Storyboard - Blank means that neither grids nor boxes will be drawn
(The Fit on One Page option is rather misleading. If selected, it will fit one frame on one page. Even if you specify All frames, it will ignore the Storyboard option.)
The additional parameters:
Frame across: specifies the number of frames across each row
Frame margin: specifies the margin of each frame (spacing between frames).
Use Print Preview (File -> Print Preview) to preview the result (the above storyboard is a sample screen capture of the result).Additional use:
- You capture the preview screen, and then save the image as bitmaps. Use the screen capture feature on your machine if available - on Windows, use the PrintScreen button.
- You can also create thumbnail of pictures using this feature. (Place the a sequence of bitmaps across frames).
When you publish a html page for Flash movie, Flash might create something like this:
Notice the <!-- URL's used in the movie--> and <!-- text used in the movie--> tags. What are these for?
The purpose of those tags are to let search engine index your Flash movie. Because search engines will not be able to index a .swf file, those tags are added by Flash to make the text "within" your .swf file searchable. If you don't care about search engine, then the tags within are safe to remove, but do not remove anything outside <!--- --> .
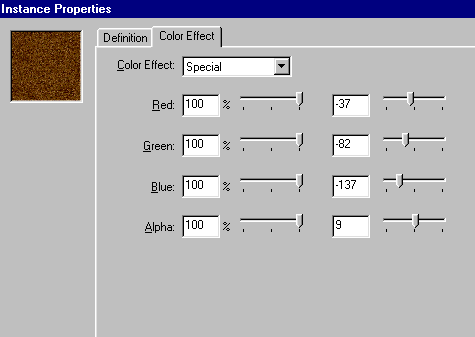
Why tint? To reduce download time. Tinted image needs only to be loaded once.
In Flash, you can only change the color values of a symbol. So, you will notice that when you import an image, it is not possible to tint the image immediately. The trick is to convert the image to symbol first. That is: after importing, click on the image, then do Convert to Symbol. Once this is done, you can then right click on the image (which now has been embedded in the symbol) to bring up the Instance Property dialog. Select the Color Effect tab. You can either use Special or Tint to change the appearance of the image.
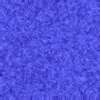
Original image:
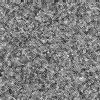
The same image, tinted with different Red, Green, Blue combo in Flash:
Note: Tinting image like this can save space (faster download speed), but it may make the rendering process slower.
(C) F. Permadi, 2001
<<
Terms
of Use