FLASH CHECKERBOARD TRANSITION EFFECT
Please wait until the picture loads.
CHECKERBOARD FADE EFFECT
This tutorial assumes that you have the checkerboard patterns ready. For instructions on how to create the checkerboard, click here.The idea is very simple. We simply tween the checkerboards from transparent to fully visible. Alternate the speed of the two checkerboards to make the effect more apparent.
STEP BY STEP TUTORIAL
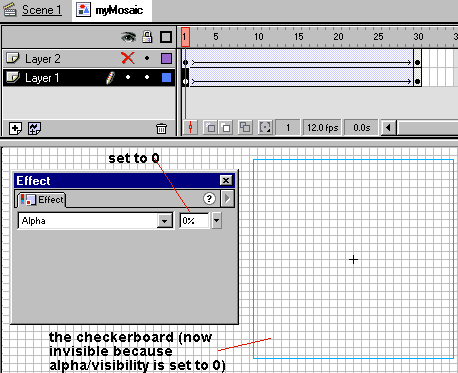
CREATING THE FADE-INA1) While still in myMosaic symbol, go to frame 1, hide one of the layer, then click the checkerboard and get the Effect window (Window > Panels > Effect). Set the Alpha to 0.

A2) Do the same with the checkerboard on the other layer (set Alpha to 0). By doing this, when the movie is running, the Alpha will be tweened form 0 to 100, creating the effect that the image fades-in gradually.
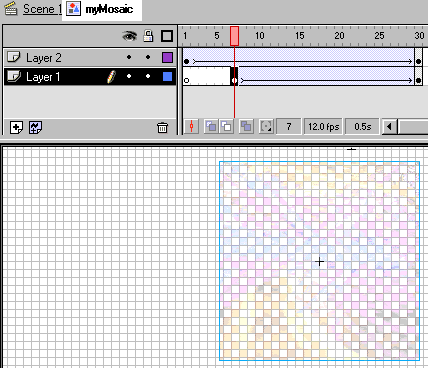
A3) We need to alter the speed of the tween so that both checkerboard does not appear at the same time. Let's move the key frame of the second checkerboard to frame 7. (Make sure to click the key frame first before dragging, if not, you won't be able to drag it.)
So the layers become like this:

A4) Go back to Scene 1, then drag an instance of myMosaic into the stage. Set behavior to Movie Clip. Then test the movie.
CREATING THE FADE-OUT
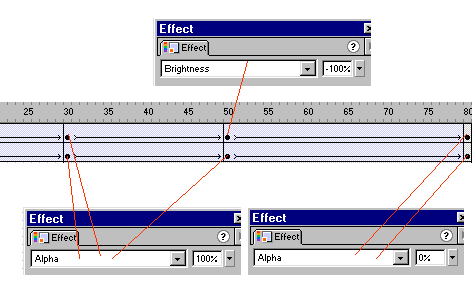
If you understand what has been done in the previous step, this is very easy. Basically, you can create all sorts of interesting effect by altering the Alpha, Brightness of the symbol in different key-frames (i.e.: frame 1 and frame 30 above). The tween calculates the difference between each frame. For example: In Layer1 above, the Alpha value of the checkerboard changes gradually from 0 (invisible) to 100 (fully visible).
To create fade out, we can reverse the process, so that Alpha goes from 100 to 0. But you can also change the brightness of the symbol to create more interesting effect. Here's the setting that I use for the example movie shown above:

<<INDEX>>
(C) 2002 F. Permadi
