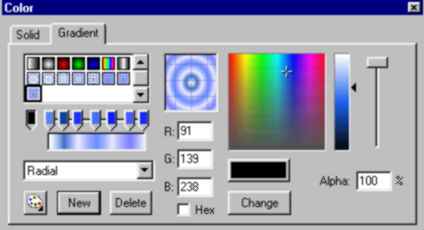
Create a Radial gradient set up
similar to shown below.
The gradient consists of three concentric blue rings, with
transparent white rings in between.
All the whites has 10% Alpha value.
All the blues has 60% Alpha value.
You don't need to be very precise, just create something
similar to the above. Use any blue from the color
mixer, and make sure that the white gaps are
transparent (alpha between 0% to 10%), and the each blue
has about 60% to 70% alpha.
Click the Oval tool. Turn
off the outline. Make sure the gradient fill is
selected, and select the blue-white gradient created
previously.
Make a circle. For the sake
of this example, set the width and height of the circle to
about 70 by 70 pixels. Draw the circle at the center
of the canvas. (Scroll down to see what the circle
might look like.)
Save the circle as a Graphic
symbol. Name it Ripple.
Step2: Create
a
symbol for the ripple animation
The next step is make the animation for the ripple.
The animation consist of the rings being enlarged and
faded-out. First, create a new Movie Clip symbol,
call it RippleAnim. Edit this symbol.
Drag an instance of Ripple into the RippleAnim
stage, at frame 1.
Shrink the Ripple instance at
frame 1 so that its size is about 20 by 20 pixels.
Put it at the center (you can use the Object Inspector to
be precise.)
Make another key-frame at frame 24.
Enlarge the Ripple instance at
frame 24 so that its size is about 250 by 250 pixels.
Create a motion tween between frame 1 to 24.
This is what the timeline should look like.
Set the Alpha of the Ripple
instance at frame 24 to 0%. (Go to frame 24, right click on the
instance, then select Properties->ColorEffect.)
Step3: Inserting the ripple
into the scene
Go back to Scene 1 main timeline.
Select/import an image to use as a
background.
Put an instance of the RippleAnim
object on a separate layer above the background picture.
Name the instance "RippleAnimInstance,"
set behavior as MovieClip.
Test the movie. Here's my example.
If everything is done correctly, it's should look
like below.
The next part of the tutorial will explain how to make
ripples appear on mouse clicks. GO
TO NEXT PART>>